Archived News of the year 2006
December 28, 2006
December 31st 2006, sunday:
As I look at this passing year, all I can say is… HAPPY NEW YEAR EVERYBODY :-]
December 5th 2006, tuesday:
It’s been a busy year concerning squirrel games… Well, not only that, also concerning submachines…. and comics as well. Ok, it’s been a busy year. Just released another squirrel game. The Puppy Fetch hosted by 2dplay is something that you have never seen before. You play as a puppy, and as your squirrel master throws a stick, you have to fetch it. Meaning: run as fast as you can, find the stick and mind the obstacles on your way, such as bad terrain, vicious cats and bulldogs. This game is timed so you better hurry up;)
November 13th 2006, monday:
newest Squirrel Family game is online. The Squirrel Harvest hosted by 2dplay is a point and click reflex and skill game, where you have to collect as many acorns as possible in given time period
October 7th 2006, saturday:
also today my newest comic album has been released. ‘Rewolucje4: Syntagma’ from Egmont Editions wraps up the revolutions series, finishes all unfinished substories and explains it all. Only for polish viewers I’m afraid. And this is not the end of this series. More albums are still to come, as I have three already finished scripts for the next parts of the series. The future is looking bright and shiny.
October 7th 2006, saturday:
Today my comic album ‘Blaki’ received ‘album of the year 2006’ award granted by audience of the International Comic Festival in Lodz. Thanks guys.
October 2nd 2006, monday:
the site has been updated to a new design and I also launched new section – movies. Besides regular animations that have been here since day one, now you can also watch my feature movies, placed on youtube servers. Enjoy.
September 5th 2006, tuesday:
well, I forgot to tell you this earlier. Submachine Zero: the ancient adventure is online since about a week now, as jayisgames competition entry. This is just a small diversion from the main storyline in submachine series, as it has nothing to do with the main plot, it’s a small and easy game, just testing the all-new rebuilt game engine, for you to see the modifications and stay up to date before launching the big game – submachine4: the Lab. I got a lot of messages lately asking about the release date of this game – I really can’t tell, I just hope it’s this year, maybe november or december…
meanwhile – short description of submachine0:
there are three facts about this game that you need to know:
1. this game was created for JayIsGames flash games contest and has nothing to do with the main submachine series storyline. It had to meet the contest’s specifications, hence…
2. this game is short. And I mean it. Don’t expect dozens of locations to wander around solving countless puzzles, this game is shorter than Submachine1.
3. this game uses completely new game engine, which I rewrote from scratch. For example, there is a new way of using items that you collect. Its more like ‘take the item and put it back’ than ‘drag and drop over something’, like it was in previous submachine games. So think of it as a small warm up before ‘Submachine4: the Lab’, which I am already developing. Till then – have fun with this ancient adventure.
August 3rd 2006, thursday:
Submachine3: the Loop is online and kicking. Continuation of the main submachine storyline, but with a different view at pnc gaming.
June 13th 2006, wednesday:
long awaited release of Submachine2: The Lighthouse game, a sequel to the succesfull Submachine. This time the area to discover is about 5 times bigger and the puzzles are more dificult. That’s what most of you wanted in your emails that I received after the first game. So enjoy, and Submachine3 is already in production.
June 9th 2006, friday:
The opening of FIFA World Cup and also the release date of ‘Everything you want to know about football…’ comic antholog, published by Kultura Gniewu. For this project I made brand new ‘Blaki’ comics, four black and white pages, scenario for this episode was written by Karol Konwerski; Go Poland!!
June 1st 2006, tuesday:
Today is a launch day of the www.kinematograf.pl site. This is a homepage of upcoming Tomasz Baginski new movie based on one of my comics from the Rewolucje comic series;
May 12th 2006, friday:
opening of the ‘Quinzaine de la BD’ exhibition in Dexia Art Center in Brussels. Pages from ‘Alicja’ comic album; as if nobody noticed this comic is exhibited and published on the very same day;
May 12th, 2006, friday:
premiere of yet another comic album, created with Jerzy Szylak’s script. ‘Alice’ is a 64-page, full colour release from ‘Timof i cisi wspolnicy’ publishing house. This comic was finished about two years ago, and been waiting to be published since. Finally, after changing the publishing house, this release saw the daylight. This album left my shelf empty, since now I’ll be publishing only new material, everything that has been done in the past worth publishing was published already.
March 25th 2006, saturday:
Premiere of my newest comic album – Wyznania Właściciela Kantoru, written by Jerzy Szylak. This is a newest reelase, however comic itself is quite old, it’s been finished in 2004. The premiere took place during the 6th Warsaw comic convention – WSK6.
March 21st 2006, tuesday:
It’s been a busy month. Third March game just released on 2dplay.com servers, Polar Jump, a sequel to popular Tribal Jump. As for now I’m done with the squirrels for sometime now, gotta finish Submachine2 immediately. So enjoy this frosty squirrel adventure and please wait patiently for the second installment from the submachine series.
March 8th 2006, wednesday:
brand new game released. Roman Rumble, branded for 2dplay.com with Thumpmonks music in it once again. Discover three roman achitecture orders in this fast paced 3-level platformer; and a new squirrel joins the family. Intro on the 2dplay.com splash page: ‘Roman Rumble is another fun and totally addicting game brought to you by 2DPlay. Our cute little squirrel travels to Rome on a quest to discover the ancient orders of Roman architecture. In this game you will have to guide the squirell through 3 orders of Roman architecture – Doric, Ionic and Corintihian, while collecting ancient Roman coins and vases. This is a highly addicting game… guaranteed to keep you playing for hours.’
March 2nd 2006, thursday:
Another game released / brought back to life. Freaky Fun of the squirrel family is a 25-level platformer, with music from Thumpmonks once again, labelled for 2dplay.com. This game was formerly available from this site under the name Freakshow, this version is upgraded, has two more levels, different main character and all of bugs repaired;
February 7th 2006, tuesday:
The squirrel family game – Octopus is back online with slightly changed graphics and what’s more important – with ambient music in the background created by ThumpMonks (www.thumpmonks.com);
January 20th, 2006, friday:
Nomination for the ‘Artist of the Year 2005’ award in a plebiscite organized by a polish nationwide newspaper ‘Gazeta Wyborcza’. This is very ennobling for me, as I was nominated in the ‘Literature’ category for my comic album ‘Rewolucje: Monochrom’, which is quite strange in a country where comics is basically treated as amusement for kids and retards. Other names in this category are very well known polish book writers, as Stefan Chwin and Mieczysław Abramowicz.
January 9th 2006:
New game launched: Tribal jump, so I’m going back to the roots of my game developing. A brand new squirrelfamily.com game, licensed to 2Dplay.com, will surely be visible on other flashgame -related pages as well in time. Update on Submachine: 1/3 of the second game finished. I’ve got a title for this game ready: ‘Submachine2: the Lighthouse’. Meanwhile I’m working on three new squirrel family games, not speaking of new revolutions album, which I just started drawing. Oh my friggin’ head, it’s wasted…
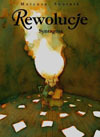 Na tle ostatnich polskich dzieł komiksowych “rewolucyjny” cykl Mateusza Skutnika sprawia wrażenie wyjątkowego. A to z tej choćby przyczyny, że nie odnosi się do jakże modnej i chętnie partolonej problematyki obyczajowej ani nie zanurza się w historycznej stęchliźnie. Co prawda, historii na kartach “Rewolucji” nie brak, jest to jednak historia wymyślona, przetworzona, “nadpisana” nad jej oficjalną, linearną wersją, znaną nam z podręczników. Skutnik, zgodnie z duchem steam punka, traktuje ją jako formę, w którą można wpisać fantastyczne treści. I czyni to z godną podziwu wirtuozerią. “Rewolucje” toczą się w czasach wielkiej rewolucji przemysłowej. Wpisują we włąściwe im realia społeczne i umysłowe niesamowite portrety wynalazców, obsesyjnie zaabsorbowanych swymi projektami badawczymi. Są to postaci fikcyjne, poruszające się po świecie skutnikowej wyobraźni, ale, co nie bez znaczenia, w jakimś stopniu realne, ponieważ stanowią zapowiedź naszych czasów. Tom “Syntagma”, czwarty z serii, wieńczy jej dotychczasowe wątki i w odróżnieniu od poprzednich pozycji zadziwia precyzją i konsekwencją. Okazuje się bowiem, że luźne historyjki, przeplatane ze sobą pozornie bez ładu i składu w pierwszych trzech tomach “Rewolucji”, pełniły określoną rolę . Mamy więc tu do czynienia z wielowątkową zagadką, która znajduje swe zaskakujące rozwiązanie w “Syntagmie”. Dowiadujemy się, jaką rolę odgrywali jej różni, jak dotąd zdawało się – przypadkowi bohaterowie: tajemniczy jegomość w stroju egipskim, wszechwiedzący Gustaw, profesor Gilbert – twórca pierwszej rakiety kosmicznej, Henryk Naphta – detektyw o statusie oświeconego, mafioso z Angkor Wat czy tańczący derwisze. Wszystkie rozrzucone wcześniej tropy znajdują zwieńczenie w finale opowieści, która, jak przystało na eksperymentatorski temperament Skutnika, jest przekazywana w kilku równoczesnych narracjach. Ogarnięcie całości stanowi dla czytelnika nie lada wyzwanie, tym bardziej, że występujące w niej postaci, nakreślone oszczędną kreską, są do siebie uderzająco podobne. Być może po to, by czytelnik wykrzesał z siebie przynajmniej tyle pasji, ile mają oni sami. Ambitny zamysł, a to dopiero początek serii.