Submachine: 32 chambers; spanish walkthrough
July 30, 2010
Guia de Submachine 32 Chambers:
1. coge el jade #1 del suelo
2. click en el boton de la maquina… se rompera
3. izquierda, click encima de la caja… coge un plato de otoño
4. click en el panel de la pared… coge el jade #2
5. abajo, derecha, izquierda, coge una palanca y el jade #3 de la arena
6. click en la parte superior de la pared… coge el plato de invierno de la parte superior izquierda
7. abajo, derecha 2 veces, veras una cabeza de piedra, coloca la palanca en la ranura, accionala…
8. izquierda 2 veces, baja por el agujero, coge el palo
9. derecha, coge el cuenco de madera
10. derecha, lee la pista de los feroglificos… aire, viento y fuego atraviesan la arena
11. derecha, click en el panel de la pared hasta que leas AIR
12. derecha, ajusta el panel a WIND, coge el jade #4
13. derecha, ajusta el panel a FIRE… abre la caja y coge una piedra redonda
14. izquierda 3 veces, baja, coge el jade #5 de uno de los peldaños, luego coloca el palo en el agujero… coge el topacio #1
15. baja, derecha, coge el jade #6
16. derecha 2 veces, coloca el cuenco en el suelo debajo de la cara… click en el circulo… coge el cuenco lleno de arena
17. izquierda, usa el cuenco de arena en el vaso de la estatua
18. izquierda, sube por la cuerda, coge el plato de primavera de la parte superior de la pared
19. derecha 2 veces, ajusta el circulo derecho con 1/4 abierto abajo a la izquierda, y ajusta el circulo izquierdo con la mitad abierta hacia abajo
20. izquierda, click en el suelo debajo del panel de la pared, coge el topacio #2, luego arrastra la puerta hacia arriba y entra
21. coge la piedra con forma de cono
22. derecha, abajo, coge la piedra cuadrada… la arena no deja bajar mas
23. sube, izquierda 3 veces, baja por la cuerda, izquierda, sube 2 veces, izquierda, usa la piedra cuadrada en la palanca de la pared…
24. derecha, baja la escalera, derecha, sube la cuerda, derecha, entra, derecha, baja 2 veces, ajusta el circulo con el 1/4 abierto abajo a la derecha… sube la escalera, pulsa el panel… baja otra vez, izquierda, coge otra piedra redonda
25. derecha, click 1 vez en el circulo (el 1/4 abierto abajo a la izquierda)…
26. regresa a la sala de la cabeza de piedra (punto 7 de la guia), coloca las piedras redondas en los ojos… coge el topacio #3
27. regresa a la sala del ultimo circulo que ajustaste (punto 25 de la guia), derecha 2 veces, coge el jade #7 de la estatua
28. izquierda, entra por el arco, derecha, coge el plato de verano junto al pie del relieve, luego click en el panel inferior derecho… coge el jade #8
29. izquierda 2 veces, click en la caja, coge el topacio #4, luego coloca la piedra con forma de cono en el agujero…
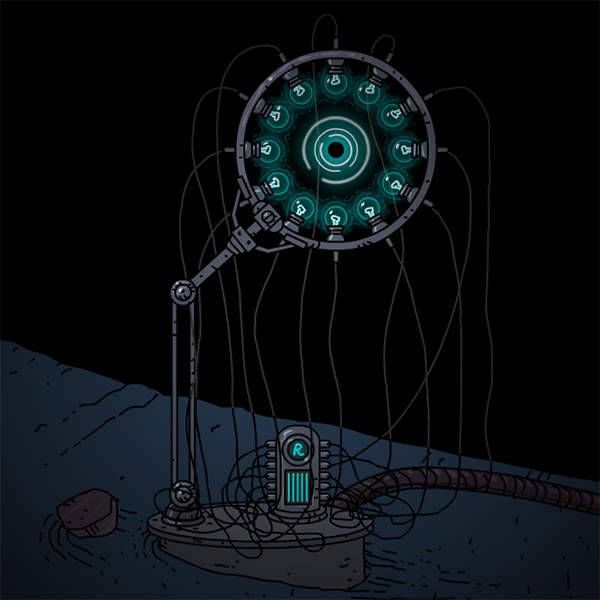
30. derecha, sube los escalones… veras un panel redondo:
– coloca los 8 jades en las ranuras exteriores… mueve el circulo de jades y ajustalo (oiras un sonido)
– ajusta el siguiente circulo (oiras otro sonido)
– coloca los 4 topacios en las ranuras que se han formado
– coloca los platos en las ranuras cuadradas
– fijate en el triangulo junto a los platos, ajustalo mirando hacia arriba (oiras otro sonido)
… mira esta imagen
– ajusta la cara del centro… mira la animacion final